Terraform Lab Activities
In this activity you will:
- Perform basic network configuration
- Create objects and security rules
- Clean up the firewall configs
Task 1 - Basic Networking Config
Change into the terraform directory. We'll use it for all of our Terraform files.
$ cd ../terraform
Edit the file panos_variables.tf and replace the default values of the variables panos_hostname, panos_username, and panos_password with the appropriate values from your VM-Series instance.
variable "panos_hostname" {
  description = "The external IP address of the VM-Series instance"
  type = "string"
  default = ""
}

variable "panos_username" {
  description = "Username of the VM-Series administrator"
  type = "string"
  default = ""
}

variable "panos_password" {
  description = "Password of the VM-Series administrator"
  type = "string"
  default = ""
}
Using your text editor create the file panos_plan.tf. We will place our Terraform plan in this file.
Start by defining the provider config, which will use the panos provider. Note that the hostname, username, and password fields refer to the variables we defined in the panos_variables.tf file.
provider "panos" {
    hostname = "${var.panos_hostname}"
    username = "${var.panos_username}"
    password = "${var.panos_password}"
}
Network Interfaces
Next, we will create the interfaces resources. Here are examples of the interfaces we will be creating:

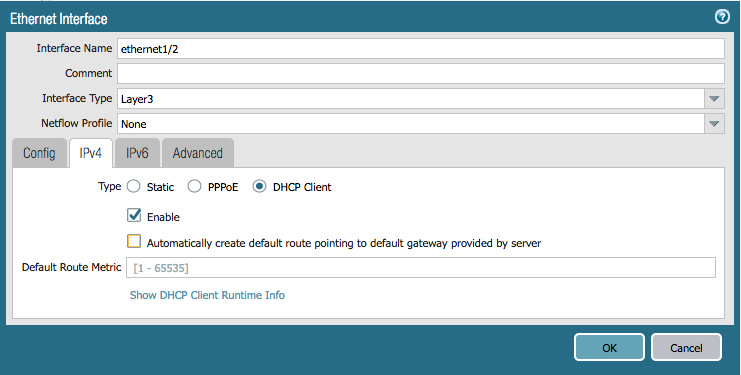
Add the following resources to panos_plan.tf. Note that the ethernet1/2 interface omits the option to create the default route via DHCP.
resource "panos_ethernet_interface" "eth1" {
    name = "ethernet1/1"
    vsys = "vsys1"
    mode = "layer3"
    enable_dhcp = true
    create_dhcp_default_route = true
}

resource "panos_ethernet_interface" "eth2" {
    name = "ethernet1/2"
    vsys = "vsys1"
    mode = "layer3"
    enable_dhcp = true
}
Refer to the provider documentation for more details on the panos_ethernet_interface resource.
Virtual Router
Now we have to associate these interfaces with the default virtual router. Add the following configuration to panos_plan.tf. The interfaces are referenced by name so that Terraform automatically knows that the interfaces will need to be created before the virtual router resource.
resource "panos_virtual_router" "vr" {
    name = "default"
    interfaces = [
        "${panos_ethernet_interface.eth1.name}",
        "${panos_ethernet_interface.eth2.name}"
    ]
}
Refer to the provider documentation for more details on the panos_virtual_router resource.
Zones
Next, we will create resources for security zones and reference the interfaces we added. Here are examples of the zones we need to create:
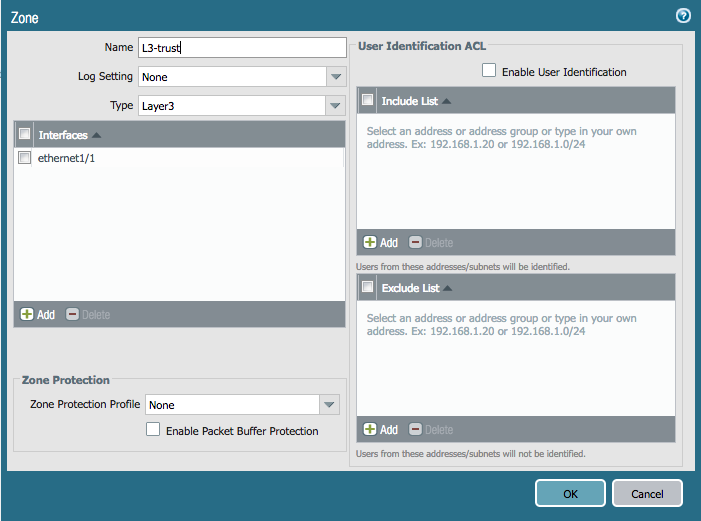

Add the following configuration to panos_plan.tf. The interfaces are referenced by name so that Terraform automatically knows that the interfaces will need to be created before the zones themselves.
resource "panos_zone" "int" {
    name = "L3-trust"
    mode = "layer3"
    interfaces = ["${panos_ethernet_interface.eth1.name}"]
}

resource "panos_zone" "ext" {
    name = "L3-untrust"
    mode = "layer3"
    interfaces = ["${panos_ethernet_interface.eth2.name}"]
}
Refer to the provider documentation for more details on the panos_zone resource.
Apply the Terraform Plan
The resulting panos_plan.tf file should look like this:
provider "panos" {
    hostname = "${var.panos_hostname}"
    username = "${var.panos_username}"
    password = "${var.panos_password}"
}

resource "panos_ethernet_interface" "eth1" {
    name = "ethernet1/1"
    vsys = "vsys1"
    mode = "layer3"
    enable_dhcp = true
    create_dhcp_default_route = true
}

resource "panos_ethernet_interface" "eth2" {
    name = "ethernet1/2"
    vsys = "vsys1"
    mode = "layer3"
    enable_dhcp = true
}

resource "panos_virtual_router" "vr" {
    name = "default"
    interfaces = [
        "${panos_ethernet_interface.eth1.name}",
        "${panos_ethernet_interface.eth2.name}"
    ]
}

resource "panos_zone" "int" {
    name = "L3-trust"
    mode = "layer3"
    interfaces = ["${panos_ethernet_interface.eth1.name}"]
}

resource "panos_zone" "ext" {
    name = "L3-untrust"
    mode = "layer3"
    interfaces = ["${panos_ethernet_interface.eth2.name}"]
}
Save and exist the panos_plan.tf file.
Let's apply this config to our firewall. First you then need to run terraform init to download all the providers we need.
$ terraform init
We'll then validate the config with terraform plan.
$ terraform plan
If there are no errors, go ahead and push your config updates to the firewall with terraform apply.
$ terraform apply
Log in to the web UI of your firewall and verify that the configuration matches the examples above. Note that because of the way Terraform currently functions the changes have only been made to the candidate configuration and have not been committed.
Task 2 - Objects and Security Rule Creation
Next, we will create resources for an address object and some security rules. Here is an example of an address object we need to create:
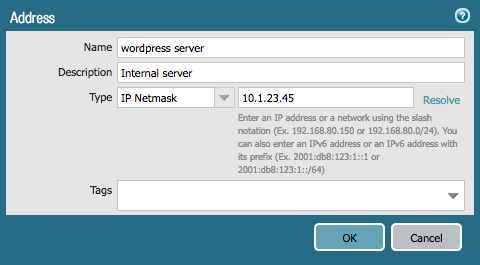
Add the following to the bottom of the panos_plan.tf file:
resource "panos_address_object" "wp" {
    name = "wordpress server"
    description = "Internal server"
    value = "10.1.23.45"
}
Refer to the provider documentation for more details on the panos_address_object resource.
Now, here is an example of the security rules that we need to create:

Add the following to your panos_plan.tf file. Just like with the networking config, zones and objects are referenced by name so that Terraform knows they need to be created before our security rules.
resource "panos_security_rule_group" "policy" {
    rule {
        name = "Wordpress Traffic"
        source_zones = ["${panos_zone.ext.name}"]
        source_addresses = ["any"]
        source_users = ["any"]
        hip_profiles = ["any"]
        destination_zones = ["${panos_zone.int.name}"]
        destination_addresses = ["any"]
        applications = ["web-browsing"]
        services = ["application-default"]
        categories = ["any"]
        action = "allow"
    }
    rule {
        name = "Outbound"
        source_zones = ["${panos_zone.int.name}"]
        source_addresses = ["any"]
        source_users = ["any"]
        hip_profiles = ["any"]
        destination_zones = ["${panos_zone.ext.name}"]
        destination_addresses = ["any"]
        applications = ["any"]
        services = ["application-default"]
        categories = ["any"]
        action = "allow"
    }
    rule {
        name = "Default Deny"
        source_zones = ["any"]
        source_addresses = ["any"]
        source_users = ["any"]
        hip_profiles = ["any"]
        destination_zones = ["any"]
        destination_addresses = ["any"]
        applications = ["any"]
        services = ["application-default"]
        categories = ["any"]
        action = "deny"
    }
}
Save and exist the panos_plan.tf file.
Apply the Terraform Plan
Let's apply the config to our firewall. We won't need to run terraform init again since the provider has already been initialized. So just check your config with terraform plan:
$ terraform plan
If there are no errors, go ahead and push your config updates to the firewall with terraform apply.
$ terraform apply
Switch browser tabs to the web UI of your firewall and verify that the configuration matches the examples above. Again, the changes have only been made to the candidate configuration and have not been committed.
Task 3 - Cleanup
Terraform will clean up our firewall configs with the terraform destroy command. Run it to prepare for the Ansible portion of the lab:
$ terraform destroy
Confirm in the firewall UI that the security rules, objects, and network configs we created have been removed.
You're now done with the Terraform portion of the lab.